Showing posts with label Bread. Show all posts

Monday, 26 April 2010

Bread Rolls: Fried bread snacks with potato filling

A very simple recipe - served as a tea time snack in many Indian households.  This is another of those recipes which I have still not been able to perfect, but is made by Hubby, every single time. Even he has taken time to perfect it. 

Sharing it for those weekend evening snacks when you have guests over, or when you simply want to indulge.

Ingredients:
 For the filling:
Boiled potatoes: 2 big, grated
Green peas: 2 - 3 tsp (optional)
Chat Masala: 1/2 tsp
Amchoor Powder: 1/4 tsp, or lemon juice: 1/2 tsp
Jeera Powder: 3/4 tsp
Red Chilli Powder: 1/4 - 1/2 tsp
Green Chilli, finely chopped: 1 - 2 (optional)
Chopped coriander leaves: 2 - 3 tsp
Salt: To taste
Black pepper: To taste


Bread slices: 6
Oil to deep fry


Method:
- If using green peas, boil in microwave for around 5 minutes. Drain and keep aside
- Peel and grate the potatoes. Add the green peas and the rest of the spices. Mix well


Making the rolls:
Step 1: Take a large bowl and fill it with water. Dip a bread slice in it
Step 2: Gently take out the slice, and press it firmly between both the palms so that the water is drained out. Take care that the slice doesnot break, though it may lose its original shape
Step 3: Put a spoonful of filling in between the slice
Step 4: Fold around the sides to cover the filling
Step 5: Gently press and roll it in your palms to smoothen and close the edges and give it an oval shape


Frying:
- Take sufficient oil in a pan / kadhai to deep fry
- Heat the oil till it almost starts smoking
- Gently dip the prepared rolls in the hot oil, one or two at a time
- Roll over using a slotted spatula so as to evenly cook from all sides.
- Fry till golden brown. This should not take more than a minute.
- Serve hot with your favourite ketchup or chutney


Note:
- If the oil is not hot enough, the bread will absorb the oil leaving the end product very oily

Tuesday, 9 June 2009

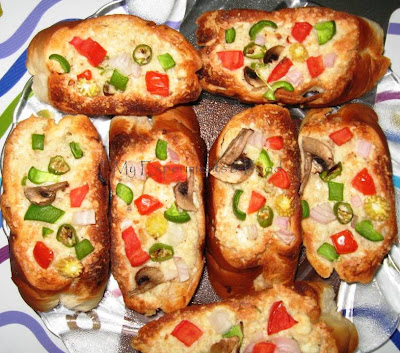
Garlic Bread topped with Vegetables

I shall not take credit for this recipe. Like the Chili Cheese Toast, this project was solely handled by my husband and is a part of the same recipe family. The ingredients are similar, and so are the calories!
That said, it tasted amazing, and I was reminded of the garlic bread served at the pizza joints. He had made it as an accompaniment to Mix Veg Pasta (maybe a post on it later) which I was preparing as a quick option for dinner.


Ingredients:
Garlic Bread Loaf
Salted Butter
Grated Cheese (We use
Amul Cheese. You can use the equivalent substitute available in your city)

Capsicum, Tomatoes, Onion (chopped)
Baby Corn (sliced)
Mushroom (Cut into thin slices)
Green Chili (Chopped)
Salt / Pepper

Method:

- Take equal quantities of butter and grated cheese. Add salt (if required) and pepper as per taste. Mix it well and keep aside
- Cut the loaf into thick diagonal slices. Arrange them on a tray / rack and grill them in the microwave / oven for 3 – 5 minutes till the slices are crisp and brown at the top
- Take out the slices and allow them to cool slightly. Turn them over and apply the cheese butter mix on the side which is not yet grilled
- Top it with pieces of chopped vegetables
- Grill it in the microwave / oven for around 3 - 5 minutes. Microwave it on high for another 30 sec so that the vegetables are softened
- Serve hot

Why I recommend it?
Like the Chili Cheese Toast, it goes well as an accompaniment to the main dish, or can be had on its own

Methi Ki Puri

Ages ago, when I was in kindergarten, our class was taken for a picnic to the city zoo. After watching the monkeys, giraffes and the lions, we had rested for lunch on the bank of a duck pond. Wondering what my Mom had packed for lunch, I opened my lunch box and it was packed with “green puris” . I was overjoyed, because I liked them more than the plain puris which were quite boring to look at.
In my later years, I realized it was my Mom’s method of feeding me all the green-leafy-vegetables which I would not have touched had it been in the form of “Palak Paneer” or “Methi Aloo” .
There are several recipes for preparing Methi ki Puri, many of which call for mixing different spices. My recipe (or rather my Mom’s) is simpler, has lesser ingredients and apart from cleaning the leaves, does not take much time.


Ingredients:

Wheat Flour (Atta): 2 cups

Methi (Fenugreek) leaves: a bunch

Salt : ½ tsp

Oil to deep fry

Method:

- Clean and wash the methi leaves. Chop them finely.
- Mix the flour, the chopped leaves, salt and enough water to make dough. This requires lesser water than what you would normally use because (a) the leaves are also moist (b) the dough for puri is harder than that of chapattis / paratha.
- Divide the dough into small balls (roughly the size of table tennis balls), and roll them into puris
- Heat sufficient oil in a kadai / frying pan and deep fry puris till puffed up and golden brown.
- Drain the excess oil on paper towel and serve hot

My Recommendation:
- I love it best with Matar Paneer

- It goes well with pickles or any other Indian curry

For those who are new to Indian Cooking:
How to Make Puris

Monday, 25 May 2009

Chili Cheese Toast

This is my Mom’s recipe, and I do not know where she sourced it from. It was, and continues to be, one of the favorite dishes of my brother.
A few weeks into my marriage, my brother introduced it to my husband. We had bought our new microwave oven then, and were planning to inaugurate it by trying out Vegetable Au gratin. Enter my brother, and he insisted that the dish be accompanied by “Chili Cheese Toast”. My husband’s curiosity and interest aroused, they both set about making it. My Mom always grilled it using her traditional oven, and in its absence, it was grilled using the “new with special features” microwave.
My husband was truly hooked on to the recipe, and after numerous trials and errors since that fateful day, he can now grill it to perfection using the microwave oven.


Ingredients:
Bread Slices: 6
Salted Butter: 2 tbsp
Grated Cheese (We use
Amul Cheese. You can use the equivalent substitute available in your city)

Capsicum (very finely chopped)
Tomatoes (very finely chopped)
Coriander (chopped)
Green Chili (Chopped)
Salt / Pepper

Method:
- Toast the bread slices in a toaster till they are crisp and light brown in texture. (You can skip this step if you are using a traditional oven-toaster-grill)
- Take equal quantities of butter and grated cheese. Add tomatoes, capsicum (around 1 tsp each), coriander and green chilies
- Add salt (if required, since both the butter and cheese are salted) and pepper as per taste, and mix well till the cheese and butter are well blended
- Spread it over the toasted bread slices. Grill it in the microwave / oven for around 2 -3 minutes or till the cheese has melted and has a golden texture

Why I recommend it?
Goes well as an accompaniment to the main dish, or can be had on its own

Warning!
High on calories, and is a complete no-no for those on a diet.