Showing posts with label Snack. Show all posts

Monday, 26 April 2010

Bread Rolls: Fried bread snacks with potato filling

A very simple recipe - served as a tea time snack in many Indian households.  This is another of those recipes which I have still not been able to perfect, but is made by Hubby, every single time. Even he has taken time to perfect it. 

Sharing it for those weekend evening snacks when you have guests over, or when you simply want to indulge.

Ingredients:
 For the filling:
Boiled potatoes: 2 big, grated
Green peas: 2 - 3 tsp (optional)
Chat Masala: 1/2 tsp
Amchoor Powder: 1/4 tsp, or lemon juice: 1/2 tsp
Jeera Powder: 3/4 tsp
Red Chilli Powder: 1/4 - 1/2 tsp
Green Chilli, finely chopped: 1 - 2 (optional)
Chopped coriander leaves: 2 - 3 tsp
Salt: To taste
Black pepper: To taste


Bread slices: 6
Oil to deep fry


Method:
- If using green peas, boil in microwave for around 5 minutes. Drain and keep aside
- Peel and grate the potatoes. Add the green peas and the rest of the spices. Mix well


Making the rolls:
Step 1: Take a large bowl and fill it with water. Dip a bread slice in it
Step 2: Gently take out the slice, and press it firmly between both the palms so that the water is drained out. Take care that the slice doesnot break, though it may lose its original shape
Step 3: Put a spoonful of filling in between the slice
Step 4: Fold around the sides to cover the filling
Step 5: Gently press and roll it in your palms to smoothen and close the edges and give it an oval shape


Frying:
- Take sufficient oil in a pan / kadhai to deep fry
- Heat the oil till it almost starts smoking
- Gently dip the prepared rolls in the hot oil, one or two at a time
- Roll over using a slotted spatula so as to evenly cook from all sides.
- Fry till golden brown. This should not take more than a minute.
- Serve hot with your favourite ketchup or chutney


Note:
- If the oil is not hot enough, the bread will absorb the oil leaving the end product very oily

Wednesday, 13 January 2010

Chatpata Hara Chana (Green Chickpeas)

Which is your least favourite job in the kitchen?

- Washing the dishes?
- Cleaning the mess after cooking?
- Chopping the veggies?
- Any other?

Well, for me the clear winner will be cleaning and chopping the vegetables - esp. ladies finger / okra, cleaning "saag" (green leafy vegetables) like methi, shelling peas and the likes. Yup, I do not like shelling peas at all. Hence, I find it easier to resort to the frozen alternate available in the market.

But, there comes a time when one is forced to slave and spend 3 hours (yes, 3 long hours) for the love of fresh green chickpeas aka hara chana / choliya. The chana, which grows in bushes (remember, chane ki jhaad?) is in the form of pods. The pods need to be individually opened to make way for the chickpeas, so that they can be cooked.


Image Source: http://www.plant-biology.com/

I love hare chane and aloo ki subzi (green chickpeas cooked with potatoes). My mom would make it when the chickpeas were in season, and it tasted yum. But I always refrained from buying it because of the work it would lead to. However, I could not stop myself this time when I visited the local super market. The pods were being sold in packets of 1 kilo each, and I went ahead and purchased it.
What ensued was a 3 hour work spent shelling the pods. I called my Mom the next day to ask her expert advice on how she does it.

**********************************

Excerpts of my conversation with Mom on Hara Chana:

Me: Mom, I bought hara chana yesterday at the supermarket yesterday.And guess what, I spent 3 hours shelling them!
Mom: Wow! That's a really long time
Me: I know. How do you do it? What's the trick?
Mom: I don't know.
Me: (confused)
Mom: Our vegetable vendor sells them all cleaned and shelled!
Me (In my mind): (Cursing the vegetable vendors in my city)

**********************************

So, I made hara chana - in two batches - once with potatoes, and the second time on their own, flavored with lemon and ginger. Sharing the second recipe with you.


Ingredients:

Shelled green chickpeas / hara chana: 2 cups
Oil (Mustard / Vegetable): 2 - 3 tablespoon
Cumin seeds: 1/2 tsp
Ginger, finely chopped: 1/2 tsp
Green chilles, finely chopped: 2 - 3 (or as per taste)
Coriander powder: 1 - 1 1/2 tsp
Turmeric powder: 1/4 tsp (Optional)
Juice of half a lemon (or more)
Chopped coriander
Salt: To taste

Method:

- Boil the chickpeas in around 4 cups of water. If you are using the pressure cooker, it will take 5 minutes on low flame after the first whistle. Drain the water.
- Heat oil in a pan / kadai
- Add the cumin seeds. When they begin to splutter, add the ginger and green chillies. Lower the flame
- When the chillies begin to change color, add the coriander powder and turmeric powder. You may also mix the spices in a few teaspoons of water to prevent burning. Stir on low heat for a few seconds.
- Add the chana and salt. Mix well.
- Turn off heat. Add the lemon juice and coriander.
- Adjust salt and lemon juice. Serve hot

Serve it as a snack, as a filling breakfast or with parathas / rotis. You can also garnish it with chopped onions and tomatoes for added flavour.


I am sending this recipe to My Legume Love Affair - 19th Helping. The event started by Susan, is being hosted this month by EC of Simple Indian Food.

Saturday, 12 December 2009

Weekend Brunch: Healthy Vegetable Wraps

This was an impromptu preparation for a Saturday brunch. Quick, healthy and tasty, and not to forget, quite filling.

I used whole wheat parathas, prepared with minimal oil. I made them in advance, and lightly heated them in a microwave before serving.
For the filling, I used whatever veggies I had at hand. You can add more variety based on your choice.


Ingredients:

For the filling:
Cabbage, finely shredded (I used half of a small sized cabbage)
Capsicum: 1 medium, cut in thin strips
Carrot: 1 medium, sliced in 1 inch strips
Onion: 1 medium, sliced
Salt, pepper: to taste
Mixed Italian herbs: 1/2 tsp (approx)
Oil (Olive or Vegetable): 1 - 2 tbsp

For the wraps / rolls:
Tortillas / whole wheat parathas: 4 - 6

Method:
- Heat oil in a pan. Add onions and saute on high heat for a minute
- Add the cabbage and carrots. Reduce the heat to medium and stir fry for around 3 - 5 minutes. Do not cook the veggies completely or else they will lose the crunchiness
- Add the capsicum and saute for another 2 minutes
- Add the salt, pepper and Italian herbs. Mix well

To Serve:
- Take a paratha / tortilla. Heat it slightly in a microwave / tawa / pan
- Place the filling in the center (or slightly away from it)
- Roll it and secure it with a toothpick
- Enjoy it with your favourite chutney / ketchup


Note: I also used the leftover filling to prepare grilled sandwich. It tasted great too. Too bad that I could not take any pictures.

Thursday, 1 October 2009

Chhole Tikki: Chickpeas served with Potato Cutlets

Indian Street food is versatile in taste and preparation. It varies as you move from one state to the other. The ingredients remain the same, in most cases, but the flavor changes by addition / deletion of spices and garnish.
Take the
Bhel puri for example. It’s popularly called so in Maharashtra and the western part of India. But in North India, it transforms to Laiya Chana, and in the east as Jhal Muri.
Jhal muri is characterized by the addition of uncooked mustard oil and coconut among other things. It does not use tamarind chutney.
Bhel puri on the other hand can be sukha (dry) or geela (wet) depending on what kind of chutney is used to flavor it. And no, it does not use mustard oil.
Laiya chana is also similar to bhel puri, but is more savory, and does not imbibe the sweetness of Bhel puri (at least that has been my experience in north India).
And all this while, the base for all the above remains the same – puffed rice.

Other similarities that I have observed are:
-
Pesarattu in Andhra Pradesh, and
Moong ki Dal ka Cheela in North India
-
Golgappa / Paani ke Batashe / Gup Chup / Pani Puri / Phuchka (the difference being the stuffing and how the water has been flavored)
-
Ragda Pattice in the West and Chhole Tikki
in the North

Am sure there are many more varieties which can be included, but the above is more limited to my experiences and travels across the country. Do feel free to add to the same.

Coming back to cooking, this weekend was made special when both my husband and I entered the kitchen together, and prepared Chhole Tikki – the north Indian street food – for a heavy snack on a lazy Sunday evening.
The idea is to prepare the chhole (flavored chickpeas) and
Alu Tikkis (Potato Cutlets) and serve them together. The Alu Tikkis were prepared by him, while the Chhole by me.


I know there are a hundred (or more) ways to prepare chhole, as well as Tikki, but sharing with you our version. My chhole recipe is an amalgamation of various sources, and has been adapted from different recipes in cookbooks as well as on the internet.

For the Chhole


Ingredients:
Chickpeas / Chhole: 1 Cup, soaked overnight
1 tsp Tea Leaves tied in a muslin cloth / 1 Tea Bag
Onion, sliced: 2 medium
Tomato, chopped: 1
Ginger Paste: ½ tsp
Bay leaf: 1
Cinnamon Stick: 1
Cumin Seeds: ½ tsp
Anardana Powder: 1 ½ tsp
Cumin Powder: 1 tsp
Coriander Powder: 1 tsp
Red Chilli Powder: ½ tsp
Oil: 3 tbsp
Salt: To taste

Method:
- Boil the chickpeas with around 3 - 3 1/2 cups water, tea leaves / tea bag, Bay Leaf, Cinnamon Stick and salt. If using a pressure cooker, which is preferable, it will take around 20 minutes (on low heat) for the chickpeas to become soft. Alternately, one can also use the canned version.
- Once cooked, remove the tea bag, cinnamon stick and bay leaf. Keep the chickpeas aside, donot drain the water.
- Heat oil in a kadhai / pan, and add cumin seeds. When the seeds begin to splutter, add the onions and stir on medium heat till they begin to change color
- Add the tomatoes, ginger paste and the ground spices. Sauté on medium heat till the tomatoes turn soft and the oil begins to separate
- Add the chick peas along with the water in which they were cooked.
- Bring to a boil, and let it simmer for 5 – 7 minutes, till the gravy becomes thick. Adjust salt as per taste.


For the Alu Tikki (as made by my husband)


Ingredients: (Makes approx 6 tikkis)
Potatoes, boiled: 4 medium
Peas, boiled: a handful
Green Chilli, finely chopped: 2
Fresh coriander, chopped
Black Pepper powder: to season
Cumin Powder: 2/3 tsp

Red Chili Powder: 1/4 tsp or as per taste
Black Salt / Rock Salt: 1/4 tsp
Chaat Masala (optional): 1/4 tsp
Juice of half a lemon
Salt: To taste
Oil: To shallow fry

Method:

- Peel and grate the potatoes. Ensure that the potatoes are at room temperature before you grate them
- Add the rest of the ingredients. Mix well.
- Grease your hands with a few drops of oil.
- Take a portion of the mixture, and shape it in a ball. Press it lightly between your palms to flatten it.
- Shallow fry on low heat till both sides are crispy and golden brown


To Serve Chhole Tikki:
- Take a tikki (or two) in a bowl
- Add a ladle of chhole on top (more if you desire)
- Garnish with finely chopped onion, tomatoes, coriander and green chilies
- You can also add whipped yoghurt and tamarind chutney on top


This recipe goes to Meeta’s Monthly Mingle: High Tea Treats, hosted this month by Aparna.

Sunday, 27 September 2009

Moong ki Dal ka Cheela … On Bread

Chilla / Cheela are savoury crepes served for breakfast, or even as snacks. They are prepared either with Besan (gram flour) or with Moong (lentils).
Moong dal cheela is something my Mom used to make quite often for breakfast, and I developed a taste for them only recently. They are a great option for Sunday breakfasts.
I also experimented with the leftover batter by dipping pieces of bread and shallow frying them for evening snacks.


Ingredients:

Dhuli Moong ki dal (De-husked split moong dal): 1 cup
Ginger: 1 inch piece
Green Chili, chopped: 1
Salt: To taste
Fresh Coriander, finely chopped
Oil

Method (For the Batter)

- Wash and soak the moong dal in warm water for around 2 hours.
- Grind the dal, green chili and ginger to a smooth paste. Add water if required.
- Add salt and chopped coriander
- Add water to make the batter of a thick pouring consistency (as you would do for dosas / pancakes). Mix well


For the Cheela / Chilla

- Heat a tawa / pan, and lightly grease it with oil
- Pour around 2 ladles of the batter and spread it in a circle, moving from the center to the outer edges in a circular format
- Pour a teaspoon of oil along the sides, and let it cook on medium heat. Lift the side slightly to check if the color has changed
- Flip and cook on the other side, adding oil on the sides
- Take care not to cook it on slow heat or else the cheela will become too crusty. Similarly if the heat is high, the cheela will change color too soon and it will remain uncooked inside
- Serve hot with your favourite chutney / ketchup


For the Moong Dal Bread Snack

- Cut bread slice in quarters
- Dip the bread in batter, coating the pieces evenly on both sides
- Heat a tawa / pan, and lightly grease it with oil
- Gently place the pieces on the hot pan, and pur drops of oil on the sides
- Cook on low heat, and flip when the colour changes to golden brown
- Add a few more drops of oil and cook the other side as well
- You may want to repeat the above two steps for a more crusty top
- Serve hot with your favourite chutney / ketchup

The Moong Dal Cheela goes to Susan’s My Legume Love Affair - 15th Helping, hosted this time by Sia of Monsoon Spice.

The Moong Dal Bread Snack goes to Sunday Snacks Event – Snacks with Bread hosted by Priya.

Wednesday, 24 June 2009

Call it Panipuri or Golgappa or Paani ke Batashe…

…this delicacy remains mouthwatering. Wikipedia tells me that it originated from Uttar Pradesh in India. But its presence is felt throughout the nation, even though it is called by different names and the preparation may slightly vary, to suit the taste buds of the particular region / state.
The Gol gappas that I have known since childhood are served with boiled potatoes / safed matar (boiled dried yellow peas / vatana), and spicy paani (water)/ jaljeera
. Both the water and the filling are cold.
I remember a time when, atleast once a year, my grandmother and my mother would jointly take up the project of making the golgappas / puris at home. Which meant a complete day’s work – the flour was kneaded and each ball was individually rolled and fried, and at least 100 puris were prepared to satisfy the taste buds of the entire family! And it would be accompanied by Aloo Tikki
, Dahi Vada and Papdi Chaat (the puris which refused to puff up while frying were served with yoghurt and tamaraind chutney). Phew! Quite an effort.
These days, I make it a point to visit my favorite Chaat
corner whenever I visit my hometown in Northern India. Or when my husband and I really have a craving for eating Paani ke Bataashe / Golgappas, we enjoy it at home. This definitely does not involve the kind of effort which my mother or grandmother put in, since most of the ingredients are either readily available in the market or can be prepared using instant mixes.


Puri / Golgappa / Phuchka
These are readily available in packets in most of the super markets or sweet shops in India. Alternately, they can be purchased from the local road side cart / joint which specializes in selling Pani Puri.
Pani
We use Badshah Pani Puri Masala
, and follow the instructions given on the pack. My husband adds juice of half a lemon to further enhance the flavor.
We prepare it around 30 minutes in advance and keep it in the refrigerator for cooling
The filling
Soak ¾ cup dried yellow peas (safed matar / vatana) overnight. Drain the water. Boil them with 1 ½ cup water in a pressure cooker (it will take around 10 minutes) or in a pot (will take much longer). In a pan, heat 1 tbsp oil, and add the boiled peas. Stir it on high heat till most of the water is evaporated. Mix 1 tsp of cumin powder and a bit of salt.
I alternately also use boiled potatoes which are either mashed or finely chopped, and seasoned with a bit of salt, red chili powder and cumin powder.


To Enjoy
Break a small hole in the crust of the puri, fill it with stuffing of your choice, dip it in the pani and place the entire puri in your mouth. Ask for more :)

Tuesday, 9 June 2009

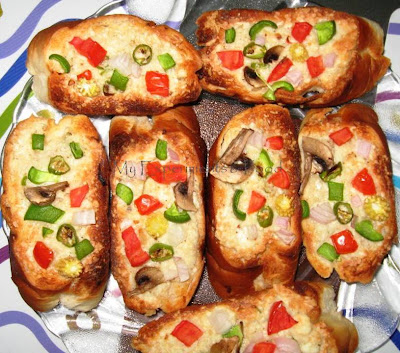
Garlic Bread topped with Vegetables

I shall not take credit for this recipe. Like the Chili Cheese Toast, this project was solely handled by my husband and is a part of the same recipe family. The ingredients are similar, and so are the calories!
That said, it tasted amazing, and I was reminded of the garlic bread served at the pizza joints. He had made it as an accompaniment to Mix Veg Pasta (maybe a post on it later) which I was preparing as a quick option for dinner.


Ingredients:
Garlic Bread Loaf
Salted Butter
Grated Cheese (We use
Amul Cheese. You can use the equivalent substitute available in your city)

Capsicum, Tomatoes, Onion (chopped)
Baby Corn (sliced)
Mushroom (Cut into thin slices)
Green Chili (Chopped)
Salt / Pepper

Method:

- Take equal quantities of butter and grated cheese. Add salt (if required) and pepper as per taste. Mix it well and keep aside
- Cut the loaf into thick diagonal slices. Arrange them on a tray / rack and grill them in the microwave / oven for 3 – 5 minutes till the slices are crisp and brown at the top
- Take out the slices and allow them to cool slightly. Turn them over and apply the cheese butter mix on the side which is not yet grilled
- Top it with pieces of chopped vegetables
- Grill it in the microwave / oven for around 3 - 5 minutes. Microwave it on high for another 30 sec so that the vegetables are softened
- Serve hot

Why I recommend it?
Like the Chili Cheese Toast, it goes well as an accompaniment to the main dish, or can be had on its own

Monday, 25 May 2009

Chili Cheese Toast

This is my Mom’s recipe, and I do not know where she sourced it from. It was, and continues to be, one of the favorite dishes of my brother.
A few weeks into my marriage, my brother introduced it to my husband. We had bought our new microwave oven then, and were planning to inaugurate it by trying out Vegetable Au gratin. Enter my brother, and he insisted that the dish be accompanied by “Chili Cheese Toast”. My husband’s curiosity and interest aroused, they both set about making it. My Mom always grilled it using her traditional oven, and in its absence, it was grilled using the “new with special features” microwave.
My husband was truly hooked on to the recipe, and after numerous trials and errors since that fateful day, he can now grill it to perfection using the microwave oven.


Ingredients:
Bread Slices: 6
Salted Butter: 2 tbsp
Grated Cheese (We use
Amul Cheese. You can use the equivalent substitute available in your city)

Capsicum (very finely chopped)
Tomatoes (very finely chopped)
Coriander (chopped)
Green Chili (Chopped)
Salt / Pepper

Method:
- Toast the bread slices in a toaster till they are crisp and light brown in texture. (You can skip this step if you are using a traditional oven-toaster-grill)
- Take equal quantities of butter and grated cheese. Add tomatoes, capsicum (around 1 tsp each), coriander and green chilies
- Add salt (if required, since both the butter and cheese are salted) and pepper as per taste, and mix well till the cheese and butter are well blended
- Spread it over the toasted bread slices. Grill it in the microwave / oven for around 2 -3 minutes or till the cheese has melted and has a golden texture

Why I recommend it?
Goes well as an accompaniment to the main dish, or can be had on its own

Warning!
High on calories, and is a complete no-no for those on a diet.

Wednesday, 13 May 2009

Corn Potato Snack

This recipe was suggested by my Mom, when I was hosting a party for a few of my colleagues, and did not know what to serve as starters.
It’s a quick recipe, and can be made in less than 15 minutes if you have boiled potatoes stocked in your refrigerator!


Ingredients:
Corn Kernels (Fresh or frozen): 2 cups
Boiled Potato (cut in small cubes): 1 Cup
Green Chili (Finely chopped): 1
Cumin Seeds (
Jeera): ½ tsp
Oil: 1 tbsp
Juice of half lemon
Salt: To taste

Method:
- Microwave / boil the corn kernels till they are soft. If you are using frozen corn, it should not take more than 5 minutes in a microwave oven. For fresh corn kernels, they should be done in 10 minutes
- Heat the oil in a pan. Add the cumin seeds. Once they splutter, add the chopped green chilies. Stir them till they start changing color
- Add the potatoes, corn kernels and salt. Stir fry for a minute
- Add the lemon juice just before serving. Do not heat once the lemon juice has been added

Why I recommend this snack?
- Its quick and easy to make
- Works best with alcoholic beverages